Showing posts with label Gear I Like. Show all posts

Saturday, March 8, 2025

The Mittens that Everyone Needs


My hands suffer when it gets cold. While I have bar mitts attached to my commuter Peugeot, that bike is also decked with studded tires until the weather gods decide it's really spring, so alternative mittens are required to keep my digits from freezing, especially if I ride another bike on dry roads. Or, walking, shoveling, etc. 

I'd read how leather mittens with wool liners are some of the warmest outdoor wear you'll find, so I took the opportunity to replace some failing synthetic lined mittens with LLBean's version.

Call them what you will: double layers, choppers, chopper mitts, work mittens, or leather mitts, ultimately, they're the warmest mittens I've ever used!

The leather shell blocks the wind, grips the handle bar, while the wool liner is warm and replaceable, should one eventually need to. Critical is the air pocket between liner and shell that traps warmth. And if both get wet, just air dry separately. 

There are many brands available in this type of arrangement. And not to worry, I can grasp the shifters and brake levers just fine.

I'm reminded of the Dr Seuss book, The Lorax and  Thneed - the thing that everyone needs!

Wednesday, November 20, 2024

Light & Motion Urban 500 & VIS 500 Bike Lights - Review

The Light & Motion bike lights, particularly the traditional flashlight-shaped versions, have appealed to me for their multi-use features. Stow it in your pocket for night-time neighborhood walks, or swap between bikes. They also function as a light inside the tent or navigating a dark campground. 

I have used the Urban 500 (mint-colored model) for nine years, purchased locally to primarily extend the commuting season after the autumn time change. In recent years, it has allowed me to ride from a home office for exercise. It's been an amazing, reliable light, and the strap recently broke in the commonly used hole. Light & Motion sells parts so it was an easy repair. 


Both 500 lumen lights have four settings: 3 variable brightness modes and one flashing mode. They both share the same button switch - depress to switch on the brightest setting and cycle through to the flash mode. Hold button down longer and the light turns off. I use the second setting - 300 lumens - the most to light completely dark rail trails. There's enough brightness to spot unlit walkers, cyclists, and the occasional cat, deer, raccoon, and other nocturnal creatures. Both have amber side lights, handy for illuminating the handlebar, and long battery life (and similar indicator) though in 25F weather understandably, a bit less.

A couple years ago, fearing the Urban's eventual demise, I picked up a discounted VIS 500 (red color) as a backup, taking a chance on a new model. 


The VIS 500 has different features; the extended battery life is noticeable. I presume that's due to newer technology. The beam pattern is not as broad so there's distinctly less peripheral lighting, thus less awareness of woodland nighttime critters. Another feature, deemed for safety, is the lock-out mode. Because it's a nuisance, I keep it unlocked for easier use. The button has taken some getting used to but now that I know the light's nuances, the VIS 500 is part of my regular rotation and was worth the discount.

Light and Motion may be discontinuing both models, though, in the future, I wouldn't hesitate to stick with the brand.

Monday, October 28, 2024

A Collection of Bicycle Bags Suits my Style


Because I have five bicycles and I'm a regular rider, I have a broad collection of bags to suit every equation. Ready for a huge grocery shop, ladies night out, or coffee outside? I've got it all covered. A few special items stand out though, for their versatility and ease of use.

The above photos show the value and versatility of small panniers. I initially created these simple, light, and effective mini-panniers for my Dahon to avoid heal strike, but they've easily become my favorite Dutch style - connected - little gems. They're easy to strap on any rear rack, using adjustable buckles and hook and loop fasteners.


I've created a few of my own. 

Stem bags, snack bags, feed bags, stem caddy - whatever you want to call those highly functional tube-shaped bags that secure to handlebar and stem - are hands down my favorite storage device for their functionality. I have one on all my bikes and have used them for storing hankies, sunscreen, hand sanitizer, phone, beer can, thermos, lip balm, tiny purse - you name it. One of the most versatile bike accessories out there - everyone's selling their version.


Again, I repurposed a tech wallet into a fanny pack/bar bag to suit my Rivendell, but it's another highly usable bag, especially for travel. I sling it around my body for safety while handling bike gear, or strap it onto the handlebars while cycling, and/or as a waist pack. I have consistently enjoyed the padded pocket for phone, stow change or valuables inside the zip pocket, divvy credit cards, mask, and cash into the 3 mesh pockets or hand sanitizer and lip balm into the external zip pocket. I especially love the unique rose-patterned fabric.


I picked up a discontinued/discounted Po Campo children's bar bag, and with a sewing adjustment, it's become a tiny purse that easily detaches at my destination. With a pullout strap, I loop it around my body when I only require 3-4 small items.

I don't think you can go wrong with certain multifunctional bags, whether it's for shopping, traveling, attending outdoor events - we all need ways to carry things - that make our time outside more organized and safe.

What special bags are your favorites?

Wednesday, April 10, 2024

Outdoor Ventures Packable Jacket Review


After our Erie Canal adventure in 2023 where we encountered chilly mornings and evenings while camping, I vowed to find an affordable, packable, warm jacket for future trips. I've had good luck with Outdoor Ventures softshell jacket so I bought their synthetic Full-Zip Puffer Jacket. I prefer bike touring during the cooler months to avoid insects, humidity, and crowds, but it requires extra gear to stay warm - a trade-off that we find worth it.

I've been wearing the jacket exclusively for the past two months, cycling in windy 30-50F range, also toting the jacket on an Amtrak adventure to visit the Philly Bike Expo. The jacket is windproof for the most part; the only exception is the zipper flap extends only 3" from the top, (misleading in the website photo) so in extreme frontal blasts a little cold seeps through. Barring that, the jacket has an incredible warmth-to-weight ratio, deep pockets, an internal chest zip pocket, a high neck, and a hood. A stuff sack is provided, but the jacket packs smaller, folded inside the left pocket. No doubt, the jacket is a good value and will ensure that I stay warm on future adventures.

Tangentially, as we lighten our camping gear, most recently using a new, 3.5 lb. two-person tent, it's apparent the tent no longer provides warmth. To save weight, the tent is constructed with mesh; the rainfly is coated ripstop nylon. And with thinner poles. It's a flimsier arrangement that requires greater care when entering and exiting the abode. No longer can I dash inside and expect instant warmth!

With the addition of a warm jacket (that can also be stuffed inside my pillow case for lumpy-free head comfort), wool socks, hat, and gloves - all of which can additionally be worn inside the tent - I should be good to go on our next bicycle tour.

Wednesday, March 27, 2024

7 Items that are Game Changers for Year-round Cycling


For Spring and Fall, I prefer the Outdoor Ventures Jacket, which provides warmth, windproof and water resistance, and sports a two-way zipper and split hem for on-saddle comfort. It's washable and after nearly 4 years of use is my preference for all-around protection during the shoulder seasons.

I love bike sandals, for touring and everyday cycling, in the summertime. There's nothing like allowing your feet to breathe! Or paired with socks. I'm on my second pair and ready to use my third. Initially a Bike Nashbar house brand, Performance offered them for a while at a discount so I snapped up an extra pair before they were discontinued. In the future, Keen sandals may be a good replacement.


Winter cycling, especially here in Vermont, is a whole other animal. I've found that bar mitts are necessary along with insulated footwear. I like the low cost, thick and fuzzy Mogee Muffs, to keep my hands toasty plus the Storm Chaser insulated slip-on boots. The footwear is grippy and roomy enough for thick socks and, if needed, there's enough space for foot warmers.


For hand comfort, I use Ergon Grips. Terry saddles are another necessity. Both provide relief, especially as I grow older. 


And a wonderful, low-cost solution to protect my eyes - I wear contacts - providing dust-free vision: the simple and stylish Dewalt safety glasses. I purchased my current pair online, but there are many versions at your local hardware store. They're also handy for riding in buggy summertime evenings. My husband loves their version of sunglasses.

What cycling-related things have made a big difference in your life?

Saturday, February 24, 2024

MYOG Stem Bag Pattern and Comparison with Other Styles

A stem bag adorns my new colorful bike.
Recently I fashioned another stem bag, part of kitting out the Hard Rock for future adventures. I aimed to coordinate with the coolest magenta/purple fade frame so with a yard of purple ripstop and some paracord as my only purchase, it's enough for a few projects. All other materials I've collected over the years: webbing cut from old helmets, backpacks, etc., ripstop saved from ground cloth trimmings, and an old greenish quilted jacket for contrasting lining. I resupply rolls of double-side hook and loop attachments using coupons at Joann's fabrics coupons when needed because, by far, that's the greatest expense.

Ripstop and internal material is pretty lightweight. I sandwiched bubble wrap package in the circular bottom and may need to insert side stiffeners, which should be easy, opening one 3" seam, but I'll test as is for now. New England humidity will be the best test of structure.
I tried a different pattern that's much simpler than previous versions (see rust-color bag below). LearnMYOG presents easy to follow patterns and an online tutorial. 

I love how deep the pouch is yet it clears the paint on the frame. We'll see how the material holds up, rubbing against Jack the Bike Rack.
I was attracted to the deeper style with a bit wider mouth, more in line with the Blue Lug example in the last photo in this blogpost. The pattern's downfall though, in my opinion, is the narrow width external pocket. I can't stick my hand to extract, for example lip balm, so I'll relegate that spot for sunscreen and perhaps utensils. It's not wide enough for a cell phone, but that will go in the main pouch anyway. However, I can adapt this feature for future stem bags and wouldn't hesitate to try the pattern again.

I still love these bags, constructed with four exterior and internal panels - a very time consuming pattern - but they lack an external pocket. These are smaller bags overall, but still highly usable. I put two on my mountain bike when needed for extra water storage. The pattern is from Bikepacking.com.


I like that the bag clears the frame, preventing wear on Rachel's sparkly paint job. 
I sprang for a Blue Lug stem bag a while ago, and I must say, this model is an eyeopener! It swallows a large mouth bottle or numerous small items, plus offers a wide external pocket. It's hook and loop attachments are beefier, not as easy to detach, but I rarely remove it, and in fact because of that feature leave it on when transporting the bike via car rack. If there's any downside to this model, it's the lack of contrast lining, which is a feature I've grown accustomed to on my creations.

There's a plethora of stem bags available, both inexpensive models, and crafted ones by local makers. I recommend supporting the local community. They offer the best selection of colors and features. Expect to pay upwards of $50 per bag, but as I can attest, there's a lot of tedious steps involved, and their expertise is money well spent. These bags will last a lifetime.

Saturday, July 29, 2023

The Most Versatile Bike Bag - Repurposing for the Win

It's more than a trunk bag...

Reconfiguring this old, oversized Gregory fanny pack into a versatile bike bag has been my most satisfying project to date.

The rugged Gregory backpacks from the late 1980s were constructed of Cordura material with numerous pockets, strong zippers with leather zipper pulls, and a myriad of accessory attachments. I got rid of the backpack a few years ago, but kept the removeable top pocket plus a gargantuan, overengineered, fanny pack that could be used with the backpack's hip belt. 

I decided the fanny pack, already embellished with external zippered pocket, four webbing loops on the bottom, straps with buckles that could be configured in different ways, plus a daisy chain webbing along the top would lend itself - simply by its features - to an interesting bike bag conversion. Like I mentioned, this fanny pack was overengineered and because of that I don't recall ever using it for it's intended purpose more than a handful of times. 

The Process
I slimmed the overall width (upper left photo) by cutting off the padded sleeve, opening up the side wings, removing the stiffeners, and pulling in and restitching the sides to form a shorter bag. The height stayed to same, that way I could use the zippers as is. Upper right photo shows the flaking internal coating - though the exterior is in great shape. The rear of the pack came with an internal stiffener, so the plan was to stiffen the bottom (lower left photo, a piece of ground pad) and front while also covering the peeling inside, attaching a piece of old green jacket (lower right photo). The cutting, piecing, and sewing was difficult - between wedging the pack into the sewing machine and getting the dimensions just right, I broke 6 needles, and gave up toward the end, so I hand-sewed the last two inches. I even went so far as to leave an opening in the green material so the blue piece is removable should I decide I don't want it in the future.

Bottom view - affix hook and loop to existing webbing straps to secure the bag to any rack.
The retrofit didn't cost anything - I even had double-sided hook and loop attachments from my stash, though I wondered how strong they would prove to be. Like my other projects, I think about the process a lot before starting, then often work slowly, reevaluating as I go because sometimes new ideas prove invaluable.

The water bottle holder was constructed with pieces of the large Gregory backpack.
First test was heading for a sunset picnic on the Dahon. I attached the four bottom attachments to the rack, then looped one buckle/strap around the seat post for extra measure. 

Additional views of the setup. Note the versatility with the two buckled strap attachments.

Carrying a lightweight picnic blanket under the second strap.
The pack didn't budge! Now I have a "trunk bag" for my folding bike.

The bag also performed flawlessly as a front carrier. Like attaching to the rear rack, all four bottom attachments are secured to the front rack, with the other two straps wrapped around the rack and fastened to lend extra strength.

I carried home a 4-pack without any wobble!

I had recently borrowed my husband's mountain bike front handlebar bag for extra storage and understood how useful it could be. There isn't enough storage in my small frame wedge for more than a lock, wallet, and phone - and wanting extra space on my mountain bike rides for a first aid kit, snacks, and extra clothing, etc. I wondered if the new purple pack would work.

The photo illustrates how I threaded the two straps through the daisy chain webbing and over the bars, tightly secured! I can access the exterior pocket easily, and the internal area by lifting the cables out of the way, but certainly doable.

There is plenty of clearance above the tire.

The bag efficiently fits three of my bikes - a testament to the existing, multiple attachment points, plus added internal stiffeners. I never expected this outcome - not in my wildest dreams!

Fanny packs are sold with the ability to attach to handlebars, or handlebar bags converted to a purse, but I've never seen a pack that's as versatile as this one.  (Let me know if you have. :) )

Wednesday, May 10, 2023

Bassi Rachel - Dialing in the Fit

Bassi Rachel, complete with racks, fenders, two bottle cages, and foot retention straps.

I have finally set up the Bassi Rachel to my liking! For touring, there are racks and fenders, and a handlebar cushioned for a change of hand positions. Most importantly, the cockpit is comfortable, finetuned for optimal body position.

In record time, compared with the former Clem-entine.

Our son also clipped the support brackets on the fenders so there's less hardware to catch on my shoes.
I installed the front fender one evening, but couldn't fathom how to install the rear one with included clamp-type bracket, so I set the project aside. Fortunately our bike mechanic son offered to finish. His method involved drilling a hole in the metal fender, bolting directly to the frame hole (see below). It's cleaner-looking for sure - thanks to him!


It's often preferable to build the bike from the frame up: you get to choose components. I have light, tubeless wheels, I asked for a setback seat post. I chose easier, click-type shifting, and V-brakes for simple adjustment, 2x gearing, and a curvy handlebar for alternate hand positions.

What I hadn't anticipated, was toe overlap. I added the ugly, but customizable Power Grip straps, rather than using old school clips and straps. I'm hoping they'll prevent my shoes from whacking the front fender, potentially tearing my shoes and/or the rubber endcaps off the fender stays. I haven't used any foot retention for 5 or so years so we'll see...

As for the handlebar set up, I've used a similar approach on the Clem-entine, so I expect this will work out well.  

For fit, I realized the Bassi Rachel is designed to sit upright, more so than my previous step through bicycle - or the way I ended up using it. Once I embraced the new fit, I lowered the seat and tilted the nose upward, and raised the handlebars slightly, and all is well.

Of course, nothing like beginning a weeklong bike tour - leaving Friday - to encounter other quirks! 

Thursday, April 6, 2023

Why Jack the Bike Rack?

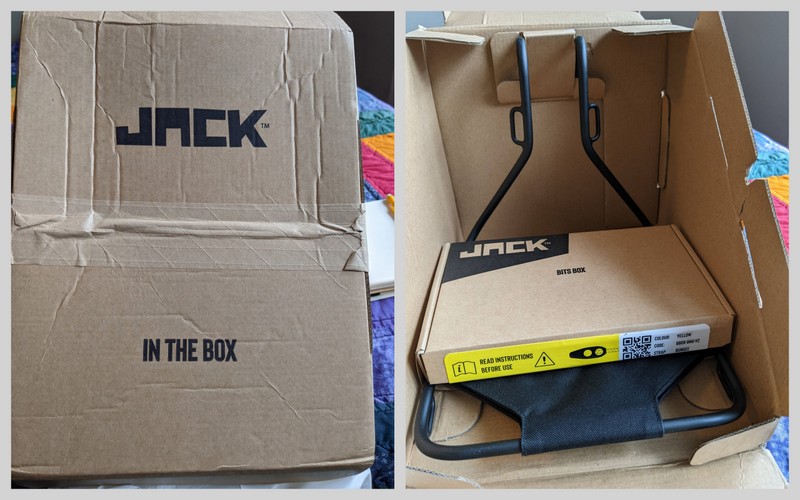
Attached close to the stem, JACK The Bike Rack frees up space on the handlebars.

I chose JACK The Bike Rack for it's easy removal and functional adaptability to fit all kinds of handlebars and bikes. Plus, the platform has multiple attachment points so conceivably you can lash just about anything there - within reason, of course. My new touring bicycle can handle bolt on style front racks, but I envision a lighter weight touring style on this Beaujolais beauty, and wanted to experiment with something different.


The rack was shipped directly from the manufacturer and was cleverly packaged, complete with spacers to fit different handlebar widths, straps, bungee cord and special carabiners - indeed much more than needed - and I'll hold onto the accessories box, should I decide to try the rack on another bike.

It took 30 minutes to sort out appropriate connections and tension, but understanding JACK's angle placement was half the battle.

I'm looking forward to trying out JACK on a weeklong tour in May. I plan to strap my sleep system up front, most likely adding a cargo net for extra security. 

Sunday, March 26, 2023

Lightweight DIY Tote Bag for the Dahon Boardwalk

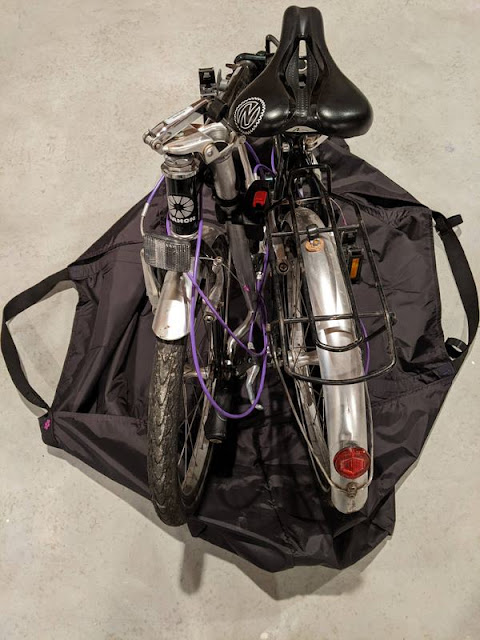
Double ripstop nylon construction, strong enough for the 30+ lb. Dahon Boardwalk.

The more I ride the Dahon Boardwalk, the more I want versatile traveling arrangements. Along with minimizing load carrying to one large front bag, one rear duffel, my goal was to create a foldable and stowable, but strong tote bag - something that's easy to lift on/off Amtrak, minimizing contact with a greasy bike, and avoiding the bicycle reservation and fee. 

With bag flat, I can easily pull up the sides.
I researched DIY tote bag construction for a one-piece design, figuring less seams was better; this pattern only had side seams. I altered the pattern by running the straps (1.5" webbing, easier on the hands) all the way under the bag for extra strength. 


For style and to define the exterior, I used purple thread and felt buttons from my stash.
I created several drawings, and measured multiple times before purchasing material and webbing. Black material was a given, but I initially wanted purple straps for contrast. However, supplies in general are expensive, so black made more sense. Using 40-50% off coupons, total cost was $40.

The bike sticks out a bit, but straps are placed correctly for carrying.
Even though I measured well, I misjudged the volume of vertical material, and had 18" extra, which also made the straps ungainly to lift. Rather than cut the bottom and compromise the ripstop's strength, I decided to tuck and fold the middle, ultimately creating 4 layers. It worked out well! At the outset, I was more concerned with ease of pulling up the sides around the bike, so erred on plenty of material.

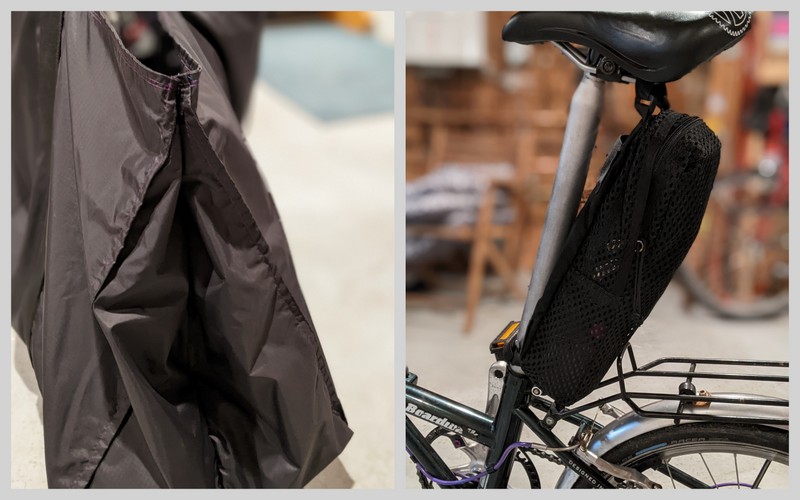
With bike inside, the bag collapses of course, so the addition of hook and loop fixtures on the handles secures the bag upright.

I also placed 3" of hook and loop tape on each top end to visually make the bag smaller. There is plenty of space to put one of my two luggage bags also inside - possibly both - but the added weight might make it ungainly.

I had planned on sewing a simple wedge-shaped compartment for the tote bag, secured to the seatpost. Magically, I had saved a mesh exterior backpacking-type pocket, which was a perfect size - all that was required was adding hook and loop attachments to the existing buckles.

I'm excited to try out this arrangement! I have an adventure planned for an April weekend with accommodating weather. 

Monday, May 23, 2022

Two Favorite Saddles: Zefal and Nashbar FC1

Women's Zefal and Nashbar FC1
Zefal women's saddle and Nashbar's FC1.
In my quest to purge bicycles, I've been shifting around saddles lately, keeping my favorites. I've been partial to the Zefal, pictured on the left, and Nashbar's FC1. Neither are expensive saddles but are perfect for more upright riding, and sadly are no longer available.

Nashbar FC1
What I find interesting is how similar both saddles are in shape and weight, yet vary widely in fabrication. Both have a wide cutout area, that suits me fine, and in fact cradles my body - best way to put it! They have similar drop noses and are not chunky looking. Both are women's wider version with synthetic covers: Nashbar has one type of covering overall while the Zefal is partly constructed with lycra-type material on top for comfort and with smoother, abrasion-resistant grey material for a two-toned look.

Women's Zefal saddle
Don't touch my Zefal!

The thing is, while I work for Terry Cycling - and use a couple of their models - not one of their saddles comes even close to these dimensions! As I learn more about saddles, I realize how lucky I am to have found these two gems that should suit me for years to come.